Sunday 17 October 2010

Video Camera Tutorial


Today we had a lesson on video cameras. We were taught;
-How to set up a tripod.
-How to set up a camera
-How to assure that all equipment and crew are ready to film.

Camera Features

Zoom- Zoom can bring a subject or scene into close-up or cause it to recede into a long shot using a zoom lens and while maintaining focus.

Focus- Focus helps the condition of the image to be clear and sharply defined.

Exposure- Exposure allows us to adjust the amount of light received by the camera lens.


The Camera Screen


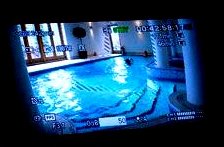
Hours : Minutes : Seconds : Frame
2:06:35:24


We need frames in order to have a film with normal timing and precision.

We can have a maximum of 25 frames per second. White balance is adjusted before filming otherwise the image will have no temperature to the colours.

To do this we must aim the video camera at a white wall and press a button which says Wht Bal (white balance) so that the camera knows what white is and can therefore pick up all the colours in the shots.

Creating a film poster....


Today in class i was put in a group and was given a camera and told to take pictures on school grounds.


-We looked around for an interesting scenery;
(this was a mistake as we didn’t thoroughly think through what we would like to portray in our poster)


-We did decide the genre of the film to be “thriller”. 


-We went to a large room behind the theatre which had black floors and walls, a chair, a table and a mirror.


Photography


-We then took many photos, at different angles, of each-other in a hooded coat to mask our identity.


-The lighting in the room was very convenient as it was quite dim which added to the eerie effect of the poster however due to this we found it hard to make the images focused.


Editing 
-We uploaded the photos onto the computer and chose one particular photo which we personally thought would be appropriate.


-I strated by using “the stamp tool” so that i could remove certain objects from the black wall such as the fire exit sign which i thought ruined the eerie, unnatural effect of the photo.


-I then made certain areas of the photo darker by using “the burn tool”, mainly on the face (to hide my identity).


-I then chose another photo and used “the stamp tool” to copy the image of me sitting on a ledge onto the black wall in the photo.
(This didn’t work as well as i had hoped because i found it difficult to get the lighting the same in both images so it looked quite fake.)


- I changed the size of the figure fron the other photo by using “transform” which meant that i could emphasize the figure in the foreground rather than the background. 

Above is the poster which i created during class, i called it Identity as it seemed to be my main theme when taking photos and during editing.

Definitions and Terminology

Today in class we have learnt a few definitions. We learnt such words/phrases as;

Mise-en-scene- The overall picture in the frame.

Denotation- Discussing the image we are observing.

Connotation- Analysing the image in further detail.

Semiotics- The study of signs and symbols.

Sign- This is an action, object or image that carries meaning or significance. 

The signifier-The object in the picture.

The signified: The implications of that object in the picture.

Sounds

Diegetic Sounds-  Sounds which are part of the “world of the film”

Non-diegetic Sounds- Sounds which come from “outside the world of the film”

Panning Sounds- A sounds that travels from one speaker to another emphasising the movement of an object of person. For example, if a aeroplane was passing by in a scene panning sound is used. It is also used in some horror films as it makes the viewer quite uncomfortable.

POV (Point of View)- This is when the viewer sees through the eyes of the character. This tends to be used in thrillers.


This image is an advertisement for a box set of the first series of Skins which is a British teen drama that follows a group of teenagers' day to day lives in Bristol through two years of sixth form. 

This image is appealing to teenagers as our initial view on this program is that it is centered around drugs, sex and alcohol. We get this idea from certain parts in the image, such as;

-“Virgin” written on acharcters forehead. 
-The boy and girl kissing on the bed.


-The bed being white silk which is unusual for a teenager so we assume that it is not their bed.


-The lighting in this image is quite harsh and bright which makes it seem as the photo was taken from an ordinary camera making it seem more real.